Contact Form

Name

Email *

Message *

Tuesday, April 26, 2016

At least the mosses are happy.

   It is a cruel day, only about 50 degrees after yesterday's 75, windy and cloudy.  But it did rain yesterday, so today the fully hydrated mosses are happy and growing.
   This log section is from a walnut tree.  I hollowed out three sections about 3/4ths inch deep in the top with a chain saw, then pushed the saw through to the bottom for drainage. Then I placed shallow plastic containers in the depressions, poking holes in them for drainage.  I then placed moss in the containers, which eventually spread over the entire surface.
   There are at least two species of moss growing here, Anomodon rostratus and a species of Brachythecium, probably salebrosum.
   The small fern at the base of the structure is Gymnocarpium dryopteris, or Oak Fern.  It only grows from six to twelve inches, so it is quite the dainty plant.  I purchase them from Prairie Nursery in Westfield, WI.  It is quite rare, and the only other place I found it for sale is a nursery in Vancouver Island in British Columbia.

Sunday, April 17, 2016

Finally--some nice weather!

   After three weeks of cool or cold weather, usually cloudy, there have been three days of sunny and warm days.  So, eight to nine hours of fun in the sun resulted.
   These two photos are of the moss Hygroamblystegium varium in its sporophyte (sexual) stage.  The plant extends a stalk (or setae), and at the top is the capsule that holds the spores, which at maturity break open to spread them in the air to colonize new areas.  This species has beautiful red setae with capsules that are green.  I took the photos when the colony was backlighted about an hour before sunset.  I had an extremely hard time getting the camera (Nikon D3200) to focus.  And I was lying on my stomach to get the right angle, so that didn't help.  It really is quite a sight that I cannot begin to capture very well.

Wednesday, April 13, 2016

An inspiration

   I recently took a short trip to Maryland, Virginia, and Washington, D.C. to see some gardens and historical sites.  On Sunday, April 1st, I visited the garden of Norie Burnet of Richmond, VA.  She and I were two of several moss gardeners featured in Annie Martin's book, The Magical World of Moss Gardening, which was published by Timber Press in 2015.  Norie has a number of paths through her three-fourths of an acre shade garden, and they are all covered in mosses of several species.  About 20 years ago, she had been failing to grow grass in those areas.  Her son convinced her to allow the beautiful mosses to take over.  They did.  Now she is one of Nature's Chosen, for as George Schenk said in his book, Moss Gardening, "Every John and Jane grows grass.  Only Nature's chosen grow moss."  Norie told me her embracement of moss was life changing--and for the better.  I know how she feels, as I experienced the same epiphany in the summer of 2005.
    Norie takes care of her entire garden alone, and she moves with considerable agility and speed.  She says she has lots of leaves each fall, picking them up in a large bucket and depositing them in various spots, including her additional uncultivated three acres of woodland.  So, what is so inspiring, besides the beauty of her moss garden?  She was about to start high school when I was born!  And I recently considered hiring a contractor to haul away my leaves, saving me 60 hours each fall.  I am so ashamed.


Saturday, April 9, 2016

Making lemonade out of lemons

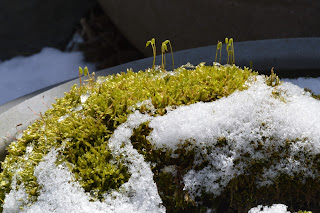
   This morning I had nearly two inches of new snow--and it was 19 degrees.  So, what was I going to do outside in such weather?  Easy, take some photos of my mosses in the snow.  As it was sunny, by late morning much of snow melted, making for some nice shots.
   Mosses will start to photosynthesize as soon as the temperature is above freezing and there is sufficient light, so when it got to the mid-30s today, the mosses were putting on new growth, as they were fully hydrated with the melting snow.
   In the third photo, the mesh is used to keep birds and critters from destroying one of my favorite moss patches.  They are so inconsiderate, thinking only of themselves!  Poor parenting, no doubt.
   In the fourth photo, my favorite moss, Anomodon rostratus, which often grows on limestone rocks, new growth of last season appears at the lower part of the moss patch.
   In the last three photos, the setae (seta, singular) or upright stalks that hold the spore-holding capsules are visible.  In a few months, these capsules will dry out and eventually release many millions of spores, each spore hoping to find a good place to begin its new life.  Very few do.


Thursday, April 7, 2016

Garden construction--2010-2015

     Finally, the history of my garden's construction comes to the end of last year.  Whew!  I get tired just looking at all the work (a.k.a. play) I did since 1970.  It was a journey filled with joy and learning.  But I also endured no small amount of frustration, finding out that in my next life I will not be a carpenter, stone mason, or plumber, as I had to be all those to get the gardens to this point.
     The first photo shows a planter built of antique bricks alongside the steps off the back lawn to the Terrace Garden in 2010.  Also in 2010, Photo 2 shows the laying of the sandstone cobblestone path leading to the underground shed.
     Photos 3 & 4 shows the construction of a stone terrace in the Terrace Garden.
     Photo 5 shows the construction of the sandstone cobblestone path leading to the southwest corner of the property in 2011.  Photo 6 shows me trying to get a hernia or a pulled back setting some large boulders near that path.
     I built a planter near the back of the lot out of smaller grey cobblestones I collected in Buffalo Street in Milwaukee in 2011, shown in Photos 7 & 8.
     Photos 9-11 show the construction from October to December of 2011 of the pergola on the hill in the northwest part of the property.  At the same time, I built a planter/bench out of granite cobblestones just to the south of the pergola, shown in Photos 12-14.  I probably had the most frustration in any project here in 46 years--but the view overlooking the back yard is my favorite in the entire garden, so I guess it was worth it.
     I finally finished the Williamsburg Garden after 35 years in 2012 when I built a brick wall on the west boundary of the garden.  This is shown in Photos 15-17.
     The raised bur oak seating area in the southwest corner was rotting, so it needed replacement.  I decided to not replace it, so I dug down four feet to make a sunken garden instead, constructing it out of big stones.  This project, done in 2012, is shown in Photos 18-20.  After finishing that, I added a new walkway behind it just to the south, shown in Photo 21.  Actually, it is mainly on my neighbor's property.  (Not surprising, I encroach on four of my neighbors' properties.)
     I built a container garden with moss amongst a Japanese maple for a TV show, The Wisconsin Gardener, in 2012.  It is shown in Photo 22.
     In 2013 I doubled the size of my Japanese garden and built a fence around it out of ipe, a Brazilian wood.  Photo 23 shows part of that fence. Photo 24 shows me adding a bamboo pipe in 2013 for a water system in the enlarged Japanese garden.  I started building an azumaya (viewing house) in that enlarged garden in Fall 2013.  Photo 25 shows me peeling the poles that appear set in place in Photo 26.  I finished the building in early 2014, shown in Photos 27-30.  I used a tool to split the bamboo that is used on the ceiling.  The hanging light fixture I designed in 1980, when I built several prototypes.  This light was built by a cabinet maker in 2014.
     Photos 31 & 32 shows the planter of granite cobblestones I built under the pergola in 2015. 
     Also in 2015 I installed two handrails, which is shown in Photo 33.
    
     Well, that is the past.  The future promises several major and minor projects, thankfully, as I get almost as much enjoyment from anticipating these projects as I do viewing them.