Contact Form

Name

Email *

Message *

Thursday, March 31, 2016

Water gardens and more--the 2000s, Volume 2

     In 1999 I began the basics of my water gardens, and they were largely finished by 2003, though I continue to tweak them even now.  There are three separate water systems or falls, each very different in appearance and sound.  All the water is pumped from the main pool and ends up back in it.  It took 43 tons of rock and concrete to finish the project.  All materials were hauled up to the back northwest corner of the lot, a vertical climb of 25 feet.  And I did it with a wheelbarrow--700 trips!  Each rock and bag of concrete was lifted at least four times, so I estimate that I lifted from 90,000 to 100,000 pounds of materials.  What fun!
     Photos 1-10 were all from 2000, starting with laying out the first stone in the first photo.  The main structure is out of Chilton Stone, a dolomitic limestone.  As there are two setbacks, I had to build three concrete foundations for the stone to rest upon.  Additionally, there was a six-foot high wall built out of concrete behind the entire structure.
     Photo 10 shows the beginning of the corner falls, about 30 feet west of the main falls.  Photo 11 shows it near completion in 2001.   Photo 12 shows the pipe that channels the water from the corner falls back to the main pool.  The left side of Photo 13 shows a rectangular pool that temporarily held the water from the corner falls.  That was removed in 2002 and is shown in Photo 16 & 17.
     Photos 14 & 15 shows the construction of the screen house overlooking the area in 2002.
     Photo 18 shows the main double falls in 2002.
     Getting back to the rest of the gardens, Photo 19 shows my first attempt at establishing a moss garden in the Japanese Garden in June 2006.  It failed, so I replaced it in the following mild January of 2007.  I made the mistake of taking the moss off the roof of my neighbor's shed.  It did not like being moved to ground.  Live and learn!
     Photos 20 & 21 shows me in 2007 cutting bricks at an angle so they could all fit tightly against the well pipe that I wanted to cover up.  In essence, the entire garden was to hide that ugly pipe.  Sometimes I get carried away.  Getting the bricks to stay vertical after being mortared was quite a task.  I finally tied heavy twine around it as I moved higher and higher.
     Emboldened by my success, I built a brick planter in 2007, as well, shown in Photo 22.
     Finally, I embarked on a huge project in the front yard near the road in Fall 2007, shown in Photos 23 & 24.  I built several intersecting terraces of rather unusual design.  It took 2000 stones to complete.  One of my neighbors criticized them, telling me I should have built them parallel as everyone else would have done.  I asked him, "Do I seem like everyone else?"


Wednesday, March 30, 2016

The 2000s were a busy time--the 2000s, Volume 1

     Looking at my photos, I realize I did a lot to begin the new millennium, so I will split it into several volumes.  It also explains why I had seven surgeries on one joint or another in eight years!
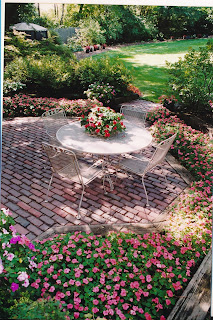
     The first photo shows the patio in 2001 with impatiens of a salmon color, which turned out to be my favorite for many years--until I stopped growing them after downy mildew attacked in 2013.  Also in 2001, Photo 2 shows the Sunken Garden looking west with red impatiens--not a good combination with salmon just beyond.
     Photos 3 & 4 show the real surge in my use of hostas in 2001 and 2002, the former in the new Terrace Garden and the latter at the back lot line, where I planted 60 hostas of three varieties.  Eventually I topped out at 730 hostas of 145 varieties. 
     Photo 5 shows me replacing RR in the upper patio in 2002.  I cut all ties with a 4-foot long cross cut saw (about 80 years old), with each cut taking about seven minutes.  I don't use a chain saw because the creosote in the ties dulls the chain after four cuts.
     Photo 6 shows me in 2002 lowering the Williamsburg Garden's northern side by a foot to make it more level.  That was to make it closer to symmetrical, important for a formal garden.  I originally made the west wall with RR ties, later changing to boulders, and finally building a brick wall about three years ago (photos to come show that).
     Photo 7 shows the terracing in 2003 of the slope on the north side of the lot, now the upper part of the Japanese Garden.
     The patio in 2003, which I finally declared "perfect," is shown in Photo 8.
     I decided I needed to tear my rotator cuff on my right shoulder (again), so I did so in 2003. I swung a pickaxe for three days digging out behind the driveway turnaround so I could make a RR tie wall in order for water to flow towards the front of the lot from the Sunken Garden.  Photos 9 & 10 show that work.  My surgeon was happy.
     Photo 11 shows the start of the Hedgerow Garden along the drive in 2005.
     Tulips and daffodils appear in the terraces in the northwest part of the garden in 2005 in Photo 12.
     Photo 13 shows the Hedgerow Garden planted with Lamiastrum galeobdolon (Yellow Archangel).
     Photo 14 shows the first use I made of hanging baskets in 2005 of Dragon Wing Begonias and of Colocasia escuelenta (Taro) in the Sunken Garden.  A similar plant, a bit larger and coarser, also in the aroid family but in the genus Alocasia, is elephant ear (though people mix them up a lot).
     Photo 15 shows the patio looking toward the back of the lot in 2005.
     Photo 16 shows both the patio, with salmon impatiens, and the Williamsburg Garden, with red begonias, in 2005.  Because the areas are separated by enough space, I can handle the differences.
     Photos 17 and 18 show the back south side of the property in 2005.  The low, mounded shrub is Stephanandra incisa 'crispa,' and the taller shrub is Viburnum dentatum (Arrowwood Viburnum).


     Photos 19 & 20 show the new southwest corner garden built in Fall 2005.  I brought in lots of big rocks to build two structures, one higher and one a circular sunken pit.  I built a horseshoe-shaped bench of bur oak, the pieces cut at a portable sawmill 30 miles west of here.  Ow!
     Photos 21 & 22 show the newly built terraces and the curving walk built in 2005 at the back of the property.
     Photo 23 shows a walkway near the north lot line towards the back of the property in 2005.
     Photos 24 & 25 show the beginning of the Japanese Garden, primarily in 2005. It is still unfinished.  The bench was made with leftover bur oak from the building of the bench in the SW corner.


Tuesday, March 29, 2016

Continuing to find my way--the 90s

     In the 1980s, I began two very important concepts that go a long way to defining my gardens.  First, my front and back lawns evolved into ovals, eventually completely surrounded by plantings, from small to medium to large (except for entrances).  I was inspired to do this while visiting Bellingrath Gardens near Mobile, Alabama in the early 1970s.  There was a six-acre oval lawn surrounded by plantings of ascending heights.  I was awe-struck by this very unnatural scene-- it was better than natural.  So, not unusual for me, I copied the concept.
     Starting in the mid-1980s, I used a single annual flower species in a given location, and I used a single color along with a white variety.  I almost did this out of frustration in trying to find good mixes of species and colors.  Nothing was just right--often not even close.  I believe what finally convinced me this was right for me was a visit to Butchart Gardens in Victoria, British Columbia in 1990.  The most famous view of that garden is from high above the flower gardens below.  It was quite spectacular--from afar.  Then I got close to the scene.  One species of annual flowers after the other, often mixed, with varied colors, were very jarring to my eyes.  It was similar to being in a large group of people, everyone wearing different colored striped shirts--and different colored plaid pants.  Then...I visited their garden where only dahlias were grown, some as high as six feet.  I loved it--even though there were many colors.  Why, I thought, does this look so much better than the garden that appalled me?  It occurred to me that all the green stems and leaves were identical, no matter the flower color, so less violence for my eyes.  Eureka!  From that point on, I never mixed annual flower species again.  I will, however, to a certain extent, mix colors, but only shades of a specific color, such as violet in impatiens in my front yard.
     That is the main reason I find so few perennial gardens that I enjoy very much.  The colors and textures are, I believe, just too hard to blend well.  However, I did visit one such garden on the north side of Milwaukee where the blending was done extremely well, a delightful place.
     So, to the photos.  The first, from 1990, is of the patio taken from the second story.  One color plus white.....but, don't ask me why I alternated pots of red and white that way.  Not good!  Photo 2 shows the same planting scheme in the front yard in 1991.
     Photo 3 shows the oval bed in front of the cobblestone planter in 1991 in grass.  Compare that to the last photo, No. 17, planted in Pachysandra by 1999.
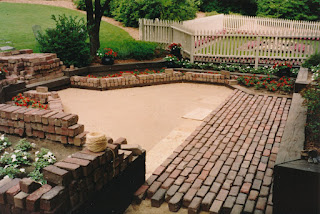
     In 1992 I re-laid the bricks in the patio, this the second time since installation in 1974.  Resting on four inches of sand, they eventually heave a bit.  Photo 4 shows that.
     Photos 5 & 6 show that by 1994 I was using various shades of violet with impatiens in the front, which I still do.
     I rebuilt the RR tie wall in the Sunken Garden in 1995, shown in Photos 7 and 8.  It was fun.  Each tie only weighs from 180 to 200 pounds--and I did it without help.  Can you say surgeon?
     After doing that, I had enough ambition to relay the bricks nearby, shown in Photo 9.
     Photo 10 shows the layout of the new Terrace Garden, near the back of the lot, started in 1995.
     Photos 11-13 show the completion of the Terrace Garden as well as the work near the underground shed and the RR planter


between it and the back lot line, done in 1996.  Work in the area continued until 1999, showed in Photo 14. 
     Photos 15 & 16 shows the extending of the bluestone walk to the north side of the house in 1999 and the gardens to the north lot line (now part of the Japanese Garden).
     Well, that's pretty much what the 20th Century looked like in the Sievert garden.  (Technically, however, the 21st Century didn't start until January 1, 2001, so I did have one more year.)